
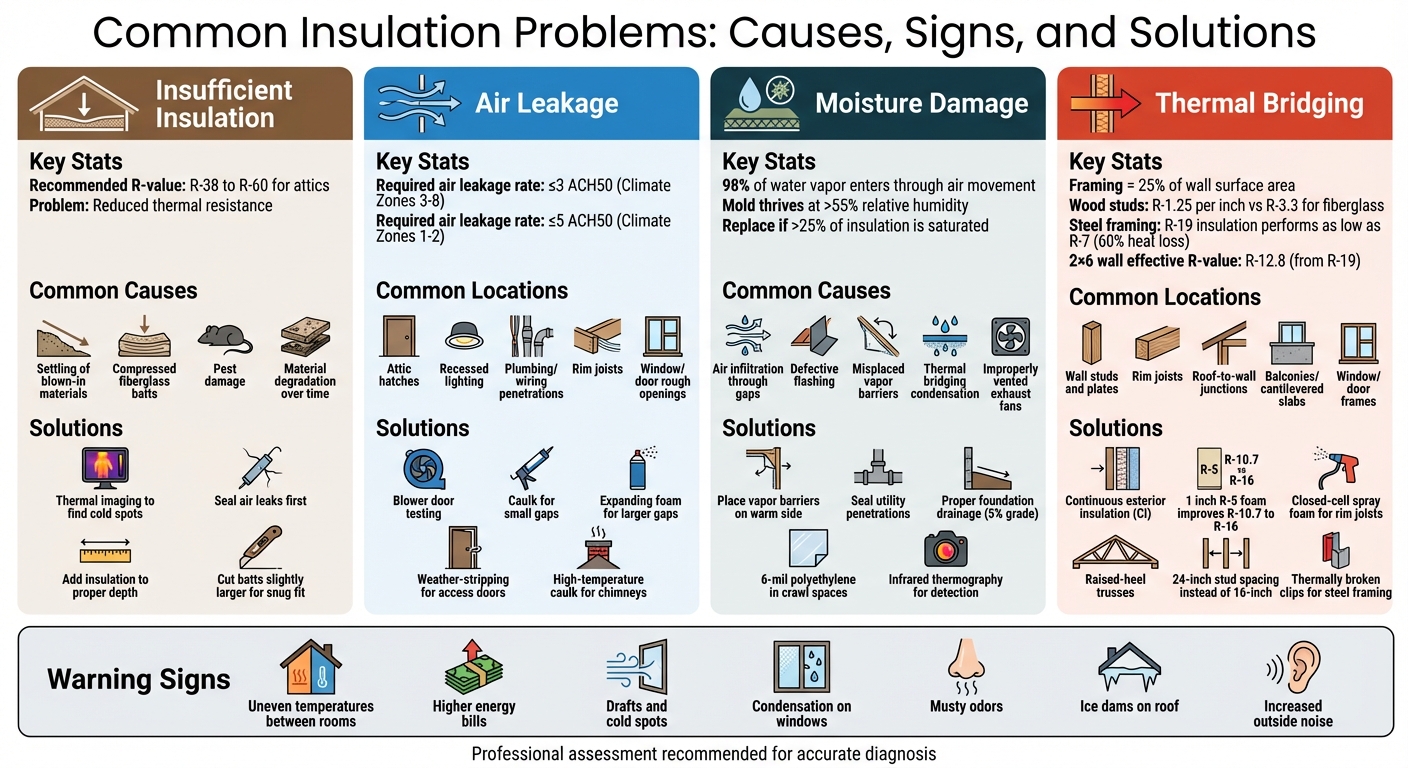
Insulation issues can lead to higher energy bills, HVAC strain, and uncomfortable indoor conditions. Key problems include insufficient insulation, air leaks, moisture damage, and thermal bridging. These issues not only waste energy but can also cause mold, structural damage, and costly repairs. Here's what you need to know:
- Insufficient Insulation: Thin or degraded insulation lowers thermal resistance (R-value), leading to heat loss or gain. Solutions include adding insulation and sealing gaps.
- Air Leaks: Cracks around pipes, windows, and framing allow conditioned air to escape. Use caulk, foam, or weather-stripping to seal these gaps.
- Moisture Damage: Wet insulation loses effectiveness and promotes mold. Address leaks, install vapor barriers, and replace damaged insulation.
- Thermal Bridging: Heat escapes through conductive materials like wood or steel framing. Adding continuous exterior insulation or using advanced framing techniques can help.
Key Takeaway: Addressing these problems early improves energy efficiency, reduces costs, and prevents long-term damage. Tools like thermal imaging and blower door tests can identify hidden issues. For complex repairs, professional evaluation ensures effective solutions.
Attic Insulation Done Wrong… and How to Do It Right!
sbb-itb-c0ea5e9
Insufficient Insulation Depth and Coverage
When insulation is too thin or incomplete, it takes a serious toll on thermal performance. The problem? Insufficient thickness lowers the R-value - a key measure of how effectively a material resists heat flow. In the U.S., attic insulation should typically hit an R-38 to R-60 rating to prevent heat loss in winter and heat gain in summer. Anything less creates a weak barrier, leading to higher energy costs and less comfortable indoor temperatures.
What Causes Insufficient Insulation
There are several culprits behind inadequate insulation depth and coverage. For instance, blown-in materials like cellulose tend to settle over time, compacting and leaving gaps at the tops of wall cavities or creating uneven layers in attics. Similarly, compressed fiberglass batts lose their air pockets when squeezed into tight spaces, reducing their ability to resist heat.
“Missing sections or poorly fitted insulation leave cold bridges, areas where heat escapes through uninsulated gaps.”
Pests can also wreak havoc. Rodents and insects often burrow into insulation to build nests, hollowing out sections and reducing coverage in ways that aren't always visible. In older homes, insulation may simply degrade over time, becoming flat, clumped, or uneven instead of staying fluffy and uniform.
Each of these issues calls for specific fixes to restore proper insulation.
How to Restore Insulation Depth and Coverage
Fixing insulation problems starts with identifying the gaps. Tools like thermal imaging cameras can pinpoint cold spots on walls and ceilings without tearing into drywall. For a simpler check, turn off the power and remove outlet covers on exterior walls. Shine a flashlight into the cavity to get a sense of the insulation's condition.
Before adding new insulation, seal any air leaks around pipes, wires, and recessed lighting using caulk or expanding foam. If you're installing fiberglass batts, cut them slightly larger than the space between studs or joists to ensure a snug fit that minimizes gaps. Be careful not to compress the material - always follow the manufacturer's thickness guidelines to maintain its thermal resistance.
Air Leakage and Installation Gaps
Even the best-installed insulation can lose its edge when air sneaks around it. Cracks and gaps in a building’s envelope let conditioned air escape, forcing HVAC systems to work harder and driving up utility bills. These leaks don’t just affect energy efficiency - they can also bring moisture into walls and attics, leading to mold, wood rot, and even ice dams on the roof.
The tricky part? Finding these leaks. Many are hidden behind finished walls or tucked into hard-to-reach places where framing meets. Often, property managers only notice the problem when tenants complain about drafts or see a spike in energy costs.
Where Air Leaks Happen
Air leakage isn’t just about insulation thickness - it’s also about the weak spots in a building's envelope. Common culprits include attic hatches, recessed lighting, and bath fans, which often lack proper weather-stripping or have gaps around them. Wiring, plumbing, and chimney penetrations also create pathways for air if caulk or foam sealant wasn’t applied during construction.
Framing can add to the issue. Over time, wood shrinks, creating small gaps in areas like top and bottom plates, headers, and sistered studs (e.g., jack and king studs). One key trouble spot is the top plate-to-attic drywall connection, which significantly impacts ACH50 scores.
Basements and crawl spaces are notorious for leaks, too. The rim joist (or band joist), where the foundation walls meet the floor framing, is a major infiltration point. Other problem areas include mudsills and the joints between footings and slabs, especially if sealing steps were skipped during construction.
“Contractors should be careful to seal all penetrations, but unfortunately these areas were where we see problems most often.”
Under the 2012 International Energy Conservation Code, homes in Climate Zones 3 through 8 need to meet an air leakage rate of 3 ACH50 or lower, while Zones 1 and 2 have a slightly higher limit of 5 ACH50. Achieving these benchmarks requires meticulous attention to every seam, joint, and penetration.
Sealing Methods and Testing
To pinpoint air leaks, blower door testing is the go-to method. This process uses a calibrated fan to depressurize the building, allowing technicians to detect air movement with smoke or fog. Infrared thermography is another tool, highlighting temperature differences that reveal hidden gaps or thermal bridges.
Once leaks are identified, the solution depends on the size and location of the gap. For small penetrations around wires and pipes, caulk works well. Larger, irregular gaps, such as those around rim joists or attic access points, are better suited to expanding spray foam. When sealing window and door rough openings, applying air seals at the interior edge ensures proper drainage while allowing moisture to escape.
For areas prone to wood shrinkage, high-quality sealant tapes like those from Siga or 3M are a smart choice. Unlike rigid foam, these tapes remain flexible over time, maintaining their seal even as lumber contracts. In high-temperature spots like chimneys, avoid foam entirely - opt for sheet metal paired with ASTM 136-compliant high-temperature caulk instead.
Sealing gaps before installing insulation is crucial. This ensures the thermal and air barriers function as a unified system rather than working at odds. Interestingly, a survey of top production builders revealed that 22% view improper installation as their biggest challenge with insulation contractors. Even experienced teams can overlook key sealing steps without proper supervision.
Moisture Intrusion and Insulation Damage
Water is the ultimate nemesis of insulation. Once insulation gets wet, it loses its ability to resist heat and instead starts conducting it, forcing your HVAC system to work overtime and driving up energy costs. But the trouble doesn’t stop there - moisture encourages mold growth, weakens wooden framing, and can even corrode steel studs, potentially leading to structural issues.
Here’s a startling fact: over 98% of water vapor enters building cavities through air movement. Even the smallest crack or unsealed gap can let in enough moisture to soak insulation and create the perfect environment for mold. Mold thrives when the relative humidity exceeds 55% and temperatures fall between 40°F and 100°F. If more than 25% of roof insulation becomes saturated, replacing the entire section is unavoidable.
What Causes Moisture Problems
The majority of moisture issues stem from air infiltration through gaps and imperfections in the building envelope. Defective flashing, worn-out sealants, and cracks in cladding allow water to seep in, driven by gravity or wind. Misplaced vapor barriers can also be a culprit - when installed on the wrong side of the wall, they let humid air infiltrate cavities, where it cools and condenses into liquid water. Thermal bridging, caused by steel studs or concrete slabs, creates cold spots where moisture condenses at the dew point.
HVAC systems can unintentionally worsen the situation. Negative pressure created by these systems can pull humid outdoor air into wall assemblies. In areas like kitchens and bathrooms, improperly vented exhaust fans that dump moisture into attics or crawl spaces only add to the problem. Even construction materials can contribute - curing concrete or drying plaster can trap moisture if insulation is installed before these materials are fully dry.
“If we control and limit water in the wall by using good design, good construction, and good maintenance, there's a good chance of controlling mold growth.”
Identifying these problem areas highlights the importance of thoughtful design and maintenance.
How to Prevent and Fix Moisture Issues
Preventing moisture problems starts with correctly placing vapor barriers. These barriers should always be installed on the warm side of the insulation to stop condensation inside the wall cavity. In hot, humid climates, this means placing them on the exterior side to block moisture from entering. Seal all utility penetrations through walls using backer rods and high-quality sealants to minimize air leaks.
Foundation drainage is another critical factor that often gets overlooked. Gutters and downspouts must direct water far from the structure, and the ground should slope away from foundation walls at a 5% grade - equivalent to 3 inches over 5 feet. For crawl spaces, lay down a 6-mil polyethylene vapor barrier across the floor, overlapping seams by 12 inches and sealing them with tape.
Detecting moisture early can save you from costly repairs. Infrared thermography is a powerful tool for spotting hidden moisture without tearing into walls. Thermal imaging cameras highlight cold spots and moisture patterns, helping technicians locate issues before they become serious. Regular inspections of roof edges, window seals, and expansion joints - especially after storms - are also essential.
If insulation gets wet, replacement is often the safest route. While fiberglass batts can sometimes be dried if exposed to clean water, cellulose insulation must always be replaced because it loses its fire-resistant and antifungal properties when wet. Addressing moisture issues promptly not only protects insulation but also ensures better energy efficiency and comfort for building occupants.
Thermal Bridging and Heat Loss Through Framing
Thermal bridging is a sneaky culprit when it comes to energy loss in buildings. It creates hidden pathways for heat to escape, undermining the effectiveness of insulation.
Heat naturally flows along the path of least resistance, which often means it bypasses insulation and travels through highly conductive materials like wood or metal studs. These structural elements, which are part of the building's framing, allow heat to escape more easily than the surrounding insulated areas.
The impact is more significant than you might think. Framing members typically account for about 25% of a wall's surface area, leaving a substantial portion of the wall without cavity insulation. To put it into perspective, wood studs offer an insulation value of about R-1.25 per inch, while fiberglass insulation provides roughly R-3.3 per inch. This means that wood studs in a 2×4 wall transfer heat 2.5 times faster than the surrounding insulation. For a 2×6 wall with R-19 fiberglass batts, the effective insulation value drops to R-12.8. Steel-framed walls fare even worse - R-19 insulation can perform as low as R-7, representing a heat loss of over 60%. Additionally, traditional methods for calculating thermal losses in steel framing often underestimate the problem by up to 35%.
“Thermal bridging is a subtle but powerful force undermining the performance of modern building envelopes. Even in assemblies packed with high R-value insulation, conductive materials can create hidden 'short circuits' for heat to escape.”
Thermal bridging doesn’t just increase energy bills. It can also lead to cold spots on interior walls, where condensation forms. These damp areas attract dust and soot, creating unsightly "ghosting" marks that trace the framing behind your drywall. Over time, moisture buildup can lead to mold growth and even rot wooden framing.
Where Thermal Bridging Happens
Thermal bridges occur wherever structural components interrupt the insulation layer. Common trouble spots include:
- Wall studs, top and bottom plates, and headers over windows and doors.
- Rim joists, which connect the floor system to the exterior wall and create a direct thermal pathway.
- Roof-to-wall junctions, where compressed insulation at the eaves leaves gaps for heat to escape.
- Balconies and cantilevered slabs, where concrete extends from the heated interior to the cold exterior.
- Window and door frames, especially when installed flush with the framing rather than aligned with the insulation.
Thermal bridging is often identified using infrared thermography, which highlights temperature differences between insulated areas and conductive framing. On the exterior, frost patterns or melted lines on frosty walls can also reveal the locations of heated studs behind the cladding.
How to Reduce Thermal Bridging
One of the most effective ways to combat thermal bridging is by using continuous insulation (CI). This involves applying an unbroken layer of rigid foam or mineral wool to the building's exterior, essentially wrapping the structure in a thermal blanket. For example, adding just one inch of R-5 exterior insulation to a 2×4 wall with R-13 cavity insulation can improve the whole-wall R-value from about R-10.7 to R-16.
Here are other targeted solutions:
- For rim joists and band boards: Closed-cell spray foam offers both high R-value and an airtight seal, addressing strong thermal bridges.
- At roof-to-wall junctions: Raised-heel trusses allow for full insulation depth over the top plate, eliminating compression issues at the eaves.
- In steel-framed buildings: Thermally broken clips, girts, or studs with plastic isolators can decouple interior and exterior metal, significantly reducing heat transfer.
- For balconies and cantilevered slabs: Structural thermal breaks made of low-conductivity materials like fiberglass-reinforced polymer or high-density polyurethane interrupt heat flow without compromising strength.
Advanced framing techniques can also help. Spacing studs 24 inches on center instead of 16 inches reduces the amount of conductive material in the walls. Insulated headers and continuous alignment of studs from floor to floor further cut down on unnecessary framing. When installing windows, positioning them "in-plane" with the exterior insulation layer instead of flush with the framing minimizes conductive paths.
When to Call J National for Insulation Repairs
Insulation problems often don’t scream for attention - they whisper. You might notice uneven temperatures from room to room, higher-than-expected energy bills, or drafts and chilly spots near windows or attic hatches. Perhaps you’ve spotted “cold stripes” on your walls or find your floors icy despite having the heat cranked up. These subtle signs often point to insulation that has failed or settled, forcing your HVAC system to work overtime to keep your home comfortable.
Another major warning sign? Moisture and mold. If you see condensation on windows or ductwork, smell musty odors, or spot brown stains on your ceiling or peeling drywall, water might be infiltrating your building’s envelope. Moisture not only flattens insulation, ruining its effectiveness, but it also creates the perfect environment for mold and rot. In multifamily or commercial properties, mold spores can spread through the HVAC system, potentially affecting the health of everyone inside. If your insulation’s moisture level exceeds 25%, it’s time for a full replacement - not just a patch-up job.
Other red flags include pests nesting in insulation, ice dams forming along roof edges in winter (a sign of heat escaping through the attic), and outside noise becoming more noticeable. Homes built before 1980 might also contain hazardous materials like asbestos, which requires careful, specialized removal.
Spotting these signs early is crucial, and that’s where a professional evaluation comes in.
Why Professional Evaluation Matters
Once you’ve noticed the signs of failing insulation, the next step is to understand the root cause. That’s where J National’s expert assessments come into play. Using tools like infrared thermography, blower door tests, and moisture meters, their team identifies issues that aren’t visible to the naked eye. These advanced diagnostics ensure the problem is addressed at its source. For example, they can differentiate between a simple leak and long-term moisture migration caused by faulty flashing or poorly placed vapor barriers.
“Surface treatments do not address underlying leak sources; identifying the water entry path is essential for effective remediation.”
With more than 25 years of experience, J National creates tailored repair plans that meet building codes while avoiding unnecessary work. They ensure your insulation is up to modern energy standards - most U.S. attics, for instance, should have insulation rated between R-38 and R-60 for maximum efficiency. Their thorough inspections also check for hazardous materials, ensuring safe removal and disposal to protect both your property and its occupants.
Emergency and Scheduled Services
Catching insulation issues early can save you from bigger headaches down the line. What starts as a small stain or a faint odor can quickly spiral into major repairs, like replacing a roof or fixing an entire façade. In extreme cases, unresolved insulation problems can lead to code violations or even building shutdowns. For commercial and industrial properties, these issues can result in costly downtime and repair bills. That’s why J National offers 24/7 availability - even on holidays - because emergencies don’t wait for business hours.
Whether you’re managing a multifamily property, running a commercial operation, or maintaining your own home, J National is the go-to solution. They handle everything from urgent fixes to planned upgrades, always with a focus on clear communication, efficient scheduling, and durable results. Their experience working in occupied properties ensures minimal disruption, no matter the project’s scope.
Conclusion
Insulation problems can escalate fast. What starts as a small stain or a faint musty smell can quickly lead to serious issues like rotted framing, corroded steel, or costly structural repairs. Even minor gaps in insulation can push your HVAC system to work harder, driving up energy costs. In severe cases, unresolved insulation issues might result in code violations, shutdowns, or expensive roof replacements - costs that far outweigh the price of early repairs.
Taking action early not only safeguards your property value but also cuts down on long-term expenses. Properly installed and sealed insulation ensures consistent indoor temperatures, reduces strain on HVAC systems, and improves indoor air quality by keeping allergens and odors at bay. To achieve these benefits, a professional assessment is key.
The complexity of insulation issues highlights the need for expert evaluation. A survey of leading production builders found that nearly half of insulation failures stem from improper installation or the wrong material choices. J National addresses this challenge with advanced diagnostic tools like infrared thermography and blower door tests. These tools identify hidden air leaks, thermal bridges, and moisture paths that might otherwise go unnoticed. With over 25 years of experience, their team delivers custom, code-compliant solutions designed to last.
Whether you're managing multifamily, commercial, or residential properties, J National offers round-the-clock repair and upgrade services. Their approach prioritizes clear communication, efficient scheduling, and minimal disruption.
FAQs
How can I tell if my insulation is underperforming without opening walls?
Identifying underperforming insulation can be done by observing a few key signs around your home. High energy bills are a common red flag, as they might suggest your insulation isn’t doing its job of maintaining a consistent indoor temperature. Similarly, if you notice uneven temperatures from room to room, drafts near windows or walls, or persistent cold spots, your insulation could be struggling.
Other indicators include moisture problems, such as mold or mildew, which may point to damaged or degraded insulation. Even pest issues can sometimes be traced back to compromised insulation. The good news? Spotting these signs can help you pinpoint potential problems without tearing into your walls.
When can wet insulation be dried instead of replaced?
When insulation gets wet, it can sometimes be dried out - but only under certain conditions. If the water exposure is recent, the area affected is small, and the material remains intact, drying may be a viable option. However, if the insulation has been soaked through, shows signs of mold, or has been wet for an extended period, replacing it is the safer choice. This helps avoid mold problems, structural damage, and a drop in R-value, which is essential for keeping insulation effective.
What’s the fastest way to reduce thermal bridging in an existing building?
Adding continuous exterior insulation is one of the fastest ways to cut down on thermal bridging. It works by reducing conductive paths - like studs or fasteners - that allow heat to escape. Exterior foam insulation forms a seamless layer over the building’s walls, effectively covering thermal bridges and boosting energy efficiency by increasing the structure’s thermal resistance.