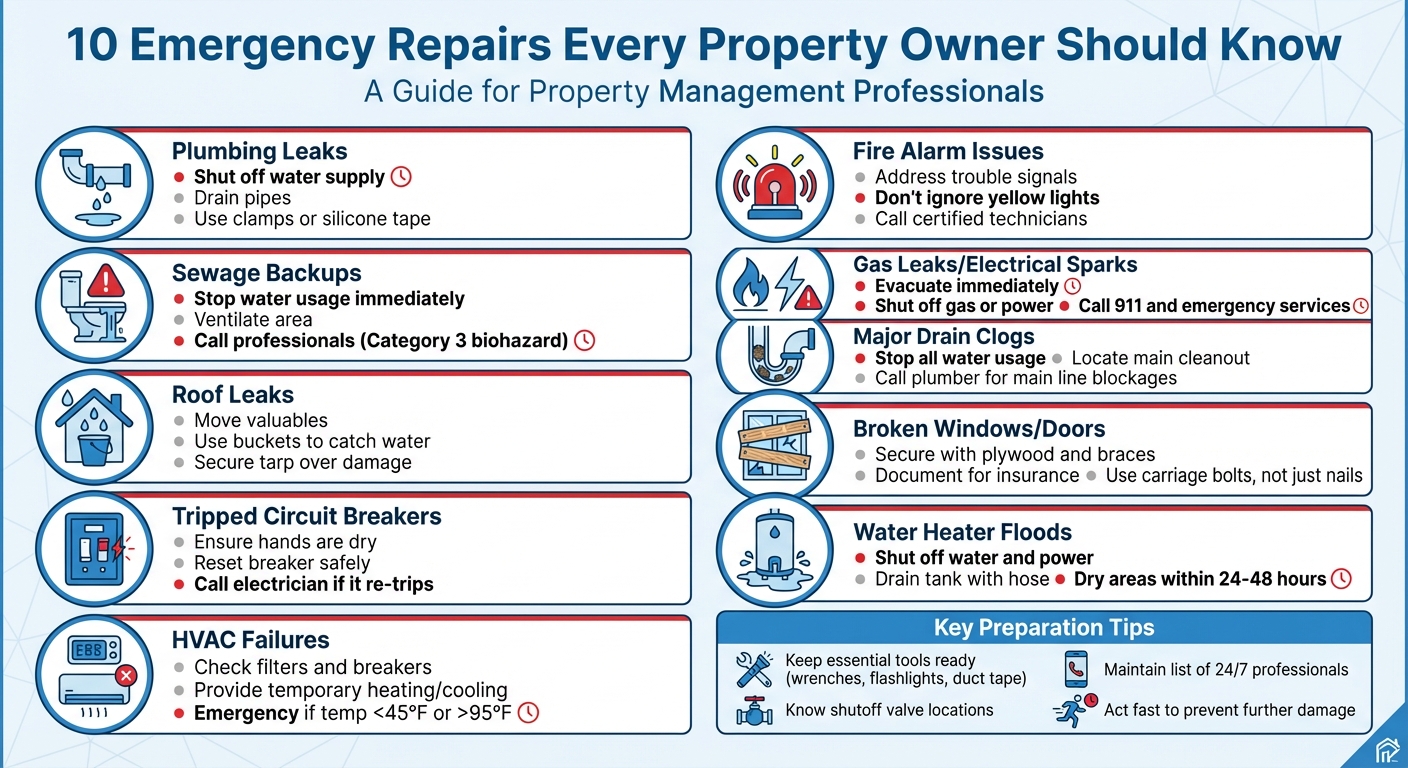
Emergencies can hit your property at any time, and knowing how to respond quickly can save time, money, and stress. Here’s a quick guide to the top 10 emergency repairs every property owner should be prepared for:
- Plumbing Leaks: Shut off water supply, drain pipes, and use temporary fixes like clamps or silicone tape.
- Sewage Backups: Stop water usage, ventilate, and call professionals immediately.
- Roof Leaks: Move valuables, use buckets to catch water, and secure a tarp to prevent further damage.
- Tripped Circuit Breakers: Safely reset breakers and call an electrician if issues persist.
- HVAC Failures: Check filters, breakers, and provide temporary heating/cooling solutions.
- Fire Alarm Issues: Address trouble signals and call certified technicians for repairs.
- Gas Leaks or Electrical Sparks: Evacuate, shut off gas or power, and contact emergency services.
- Major Drain Clogs: Stop water usage and call plumbers for main line blockages.
- Broken Windows/Doors: Secure openings with plywood and braces, and document for insurance.
- Water Heater Floods: Shut off water and power, drain the tank, and dry affected areas quickly.
Preparation is key: Keep essential tools (wrenches, screwdrivers, flashlights, duct tape), know where shutoff valves are located, and maintain a list of trusted 24/7 professionals. Acting fast prevents further damage and keeps your property safe.
The Most Common Rental Repairs and Problems You Should Know About
sbb-itb-c0ea5e9
1. Stopping Active Plumbing Leaks
In a plumbing emergency, quick and accurate action can make all the difference in reducing damage.
Immediate Action Steps
Start by locating the fixture valve and shutting it off. If that doesn’t stop the water flow, close the main water supply. To drain any remaining water, open faucets and flush toilets.
“Knowing what to do in the initial moments of a plumbing emergency can prevent extensive damage.”
— Mike Martinez, Owner, Accountable Home Plumbing
If water is near electrical fixtures, turn off the local power immediately and wear non-slip footwear to stay safe. For water heater leaks, cut the power - flip the breaker for electric units or turn the gas control to "Off" - and close the cold-water inlet valve.
Once the water flow is stopped and pressure is relieved, gather the tools and materials needed for a temporary fix.
Tools and Materials Needed
Having the right tools on hand can save valuable time. Keep items like adjustable wrenches, pipe wrenches, and pliers ready. For temporary repairs, stock materials such as clamps, rubber patches, and silicone tape. Additionally, have buckets, towels, mops, and a wet/dry vacuum to manage standing water. Safety gear like a flashlight, rubber gloves, and eye protection is essential, especially when working in tight or poorly lit spaces.
When to Call Professionals
If your efforts don’t stop the leak or if the issue is complex, it’s time to call in the pros. Contact J National for emergencies such as leaks inside walls, burst pipes, or those near electrical panels or gas lines. Professional help is also necessary for sewage backups, failed water heater tanks, or repairs that require cutting or soldering pipes. If you can’t locate the main shut-off valve or notice structural damage like sagging ceilings or collapsing floors, seek emergency services immediately.
Property Damage Prevention
After stopping the leak, take steps to protect your property. Use towels or sandbags to contain water and prevent it from spreading, especially to other units. Elevate furniture on blocks or place plastic sheeting underneath to prevent moisture damage to wood. To avoid mold growth, use high-efficiency fans and dehumidifiers to dry the area within 24 to 48 hours. Don’t forget to document the damage - take photos and videos of the leak source and affected areas before starting cleanup. This evidence can be crucial for insurance claims.
2. Containing Sewage Backups
Sewage backups are classified as Category 3 "black water", which can pose serious health risks. This contaminated water is filled with harmful bacteria like E. coli, viruses such as Hepatitis A, and toxic chemicals. With U.S. sewer lines aging - over 500,000 miles averaging more than 30 years old - and backups increasing by about 3% each year, property owners need to act quickly when faced with this issue. Here's how to respond promptly to minimize health risks and property damage.
Immediate Action Steps
- Stop all water usage: Avoid flushing toilets, running sinks, or using dishwashers and washing machines. This prevents additional waste from entering an already compromised system.
- Shut off water and electricity: Turn off the main water supply and, if safe, cut power in affected areas to reduce electrocution risks.
- Evacuate children and pets: Keep them away from contaminated areas to limit exposure to harmful pathogens.
- Ventilate carefully: Open windows and doors to improve airflow, but avoid using central HVAC systems or fans, as these can spread airborne contaminants.
- Check the sewer cleanout: If safe, cautiously open the main sewer cleanout to relieve pressure, but stand clear to avoid any sudden surges.
When to Call Professionals
Sewage backups are not a DIY job. Contact J National immediately for expert help. Signs of a main blockage include multiple drains backing up, bubbling toilets, or water coming out of floor drains. These issues require specialized tools like sewer cameras or industrial rodding equipment.
“Sewage cleanup is considered Category 3, Biohazard cleaning and requires special certified training, proper personal protection, specialized equipment, specialized cleanup and disposal, and proper treatment of the affected areas.”
Professional cleanup can take 1 to 3 days, while full repairs may extend over a week. Costs vary widely, from around $3,000 for minor bathroom overflows to over $75,000 for severe contamination. Porous materials like drywall, carpet, and insulation that absorb wastewater must be removed and disposed of since they cannot be sanitized.
Property Damage Prevention
Before entering contaminated areas, wear protective gear such as heavy-duty rubber gloves, waterproof boots, and a mask. Use towels or sandbags to block doorways and contain wastewater, and move unaffected items to higher ground or cover them with plastic sheeting to shield them from further damage.
Many property owners are responsible for maintaining the sewer lateral - the pipeline connecting their building to the city sewer system. Installing a backwater prevention valve can prevent sewage from re-entering your property during system overflows, offering an extra layer of protection.
3. Covering Roof Leaks from Storm Damage
When storms strike, roof damage can escalate quickly. Water intrusion can lead to mold growth in as little as 24 to 48 hours, and nearly 80% of roofs fail early due to poor installation or lack of maintenance. If a leak develops during or after severe weather, acting fast can prevent costly structural damage.
Immediate Action Steps
Handling roof leaks effectively starts with quick, organized steps to minimize further damage. Move furniture, electronics, and valuables away from the affected area. Place buckets or trash cans under drips to catch water. If you notice a bulging ceiling, carefully poke a small hole in the center with a screwdriver to create a controlled drainage point. This can help prevent a full ceiling collapse.
In the attic, you can nail a cotton string from the wet spot to a bucket to direct water away from insulation. However, avoid climbing onto the roof during storms, high winds, or when surfaces are slick. Falls are a leading cause of injuries in construction, and safety should always come first.
Tools and Materials Needed
Being prepared with the right tools and materials can make a big difference. Keep these items on hand:
- Buckets and towels
- Plastic sheeting
- A screwdriver
- Heavy-duty (6–8 mil) polyethylene tarp
- 2×4 boards
- Galvanized screws
- An extension ladder
For attic inspections, use a flashlight, wear rubber-soled shoes, and if needed, a safety harness. When securing a tarp, use the "sandwich method": wrap the tarp edges around 2×4 boards and screw the boards directly to the roof. This method avoids creating new leak points, as nailing through the tarp can worsen the problem. Ensure the tarp extends at least 3 to 4 feet beyond the damaged area and overlaps the roof ridge to direct water away from the patch. Temporary fixes like duct tape, silicone caulk, or spray foam are not recommended - they rarely adhere to wet surfaces and can complicate future repairs.
When to Call Professionals
Sometimes, professional help is non-negotiable. Contact a roofing expert if you notice structural issues like a sagging roof deck, leaks near electrical systems, or if your roof is steep, high, or made of materials like tile or metal. Large holes caused by fallen trees or heavy debris also require a professional assessment to check for deeper structural damage.
“A tiny leak during a dry spell might wait a day or two for repair, but that same small leak right before a major thunderstorm becomes an urgent situation that needs immediate attention.”
Emergency roof repairs typically range from $380 to $1,770, with an additional $100 to $300 for immediate or after-hours service. Professional tarping costs about $450 and can safeguard your property for one to six months, depending on the quality of materials and weather conditions. Many insurance policies cover emergency mitigation for sudden events, but failure to take reasonable steps to prevent further damage may result in denied claims.
Property Damage Prevention
Proactive measures can significantly reduce the likelihood of storm damage. Regular maintenance can cut emergency repair needs by up to 70%. Trim overhanging branches and clean gutters twice a year - spring and fall are ideal times to do this. For commercial buildings with flat or membrane roofs like TPO or EPDM, avoid DIY patches, as they can trap water and worsen the issue.
After a leak, keep indoor humidity below 60% - ideally around 35% - to prevent mold. Use wet/dry vacuums, fans, and dehumidifiers to dry wet areas quickly. Remember, using unapproved materials for repairs can void warranties and potentially impact insurance claims.
Just like plumbing or sewage problems, addressing roof leaks promptly is key to avoiding long-term damage and higher expenses down the road.
4. Resetting Tripped Circuit Breakers
A tripped circuit breaker can cut power to entire floors or critical systems in your building. While resetting one might seem simple, doing it incorrectly can lead to serious safety risks. Electrical malfunctions cause over 24,000 residential fires each year, making it essential to follow proper procedures.
Immediate Action Steps
Before anything else, ensure your hands and the area around the electrical panel are completely dry. Locate your service panel, which is often found in basements, garages, or utility closets. A tripped breaker typically sits halfway between "ON" and "OFF" or displays a red or orange indicator.
Start by unplugging high-wattage appliances like microwaves, space heaters, or hair dryers from the affected circuit. This prevents power surges or another immediate trip. Inspect the panel for scorch marks, rust, or burning odors - if you notice any of these, stop and call an electrician right away.
To reset the breaker, push it fully to the "OFF" position before switching it back to "ON". Stand to the side of the panel and use only one hand to reduce the risk of electrical shock. If the main breaker trips, turn off all individual branch breakers first, reset the main breaker, and then reactivate the branch breakers one at a time.
“Never force a breaker to stay on. It's trying to protect you - listen to it.”
Tools and Materials Needed
Having the right tools can make a big difference during a power outage. Keep a reliable flashlight handy to navigate dark areas. For added safety, use insulated gloves and safety glasses. A multimeter is useful for checking whether a circuit is dead or if you're dealing with a blown fuse in older systems. Make sure the circuit directory inside your panel door is clearly labeled to help you or maintenance staff quickly identify affected areas. These tools can help you assess the situation and decide if professional help is needed.
When to Call Professionals
If the breaker trips again immediately after resetting, trips multiple times in a week, feels hot, behaves oddly (like feeling spongy), or emits buzzing or hissing sounds, it’s time to call a licensed electrician. Also, seek professional assistance if the panel itself feels unusually warm.
Electricians typically charge $40–$120 per hour, and replacing a circuit box can cost around $1,150. While these expenses may seem high, they’re far less costly than dealing with an electrical fire or tenant injury.
Property Damage Prevention
Regular electrical inspections are key to preventing frequent breaker trips. About 65.7% of electrical projects involve service upgrades, while 34.3% focus on repairs like blown fuses or flickering lights. If your building is over 30 years old and hasn’t been inspected recently, schedule an evaluation to catch potential issues before they escalate.
Educating tenants about what qualifies as an emergency versus a simple tripped breaker can also reduce unnecessary service calls. Clear communication ensures maintenance teams can prioritize real emergencies. Remember, more than 12 million people experience home-related injuries each year.
5. Responding to HVAC System Failures
When an HVAC system fails, quick action is critical to protect tenant safety and prevent further damage. This urgency becomes even more pronounced during extreme weather. If outdoor temperatures dip below 45°F or climb above 95°F, the situation can escalate to an emergency, threatening both habitability and health. Swift responses can help avoid tenant complaints, legal troubles, and secondary issues like mold, which can develop within 24 to 48 hours in high-humidity environments.
Immediate Action Steps
Start by checking for any immediate hazards. If you notice a gas odor (often compared to "rotten eggs"), sparks, or smoke, evacuate the area and contact emergency services right away. For non-critical situations, turn off the thermostat and shut down the main breaker.
Next, inspect the circuit breaker for any tripped switches and replace thermostat batteries if the display is blank. A dirty air filter can also cause problems, so swap it out if needed.
Prioritize areas that require urgent attention, such as server rooms, medical facilities, or units with elderly residents or children. Notify affected tenants about the issue, provide a repair timeline, and recommend temporary relocation if conditions become unsafe. To maintain livable temperatures, consider using portable heaters in winter or fans and spot coolers in summer until the HVAC system is repaired.
“Turn off the HVAC system to prevent additional damage or hazards until a professional can assess the situation.”
— Aztec Mechanical
Once these steps are completed, gather the necessary tools to address the failure.
Tools and Materials Needed
Prepare an emergency kit that includes essentials like a flashlight with extra batteries, adjustable wrenches for plumbing or gas connections, and both flathead and Phillips screwdrivers for accessing electrical components. Insulated gloves and safety glasses can provide added protection when working with electrical parts.
Temporary climate control equipment, such as portable heaters or fans, can help keep tenants comfortable during repairs. Other handy items include duct tape, Teflon tape for threaded connections, silicone sealant, replacement fuses, extra thermostat batteries, and high-efficiency air filters (MERV 13 or better, per EPA recommendations). For water-related issues, keep buckets, towels, and a garden hose nearby.
If these troubleshooting efforts don’t resolve the issue, it’s time to call in the professionals.
When to Call Professionals
Avoid attempting complex repairs. Contact an HVAC technician immediately if the system repeatedly trips the breaker, emits burning smells, makes grinding or banging noises, or fails during extreme weather. Emergency service calls typically range from $500 to $2,000, with after-hours or holiday rates often doubling due to premium labor and rush parts. During peak times, technicians may take 8 to 12 hours to arrive, so it’s wise to maintain relationships with multiple 24/7 HVAC service providers. Documenting visible issues can also help speed up the diagnosis process.
Property Damage Prevention
Preventing HVAC emergencies starts with regular maintenance. A well-maintained system can reduce emergency calls by 30% to 50% and lower overall property costs by 12% to 18%. Schedule annual professional inspections and encourage tenants to change air filters regularly to avoid unnecessary strain on the system. Ensure there’s at least a 3-foot clearance around HVAC units and keep electrical panels accessible to speed up repairs. Clear communication with tenants can also cut down on non-emergency calls. With over 12 million home-related injuries reported annually, regular safety checks are a vital part of property management.
6. Testing and Reactivating Fire Alarms
A malfunctioning fire alarm not only puts lives at risk but can also lead to legal troubles. Fire alarm panels use three key signal types to communicate issues: Alarm signals (red light for emergencies), Supervisory signals (yellow light for system-related issues like a closed valve), and Trouble signals (yellow light indicating maintenance concerns). Understanding these signals ensures you can address problems quickly without alarming tenants unnecessarily.
Immediate Action Steps
When a trouble signal appears, start by checking the circuit breaker dedicated to the fire alarm system. This breaker should be clearly marked and used exclusively for the alarm. Press the "silence" button to stop the beeping, then record any error codes or messages before attempting to reset the system.
For addressable systems, use the control panel to pinpoint the faulty detector or pull station. Look for potential environmental triggers, such as steam from kitchens, dust accumulation, or interference from HVAC systems. If you detect electrical hazards - like sparking, buzzing, or the smell of burning near the panel or wiring - evacuate the area immediately and contact emergency services.
Quick action is crucial to maintaining both safety and compliance when dealing with fire alarm issues.
“A trouble signal means your system has detected an operational or maintenance issue that needs attention. It's not an emergency, but it does require action.”
Following these steps can help you reset your fire alarm system efficiently, keeping your building safe.
When to Call Professionals
If troubleshooting doesn’t resolve the issue, it’s time to bring in licensed technicians. Tasks like replacing backup batteries (which generally last 3 to 5 years), cleaning or replacing detectors, repairing wiring, or reprogramming control panels should always be handled by qualified professionals. For example, states like California require that only licensed technicians perform fire alarm repairs to ensure compliance. Additionally, annual comprehensive testing following NFPA 72 standards must be conducted by certified experts.
“73% of commercial fire alarm failures have nothing to do with faulty equipment. The real culprit? Neglected maintenance.”
— Seth Kozlik, Fire Testing Solutions
Preventing Property Damage
Regular maintenance is your best defense against fire alarm failures. Monthly tests by property staff - such as verifying the control panel and checking notification devices - can catch small issues before they escalate. During construction or renovations, cover detectors to protect them from dust and paint damage. Avoid using compressed air to clean smoke detectors; instead, stick to cleaning methods approved by the manufacturer. Staying diligent with upkeep minimizes the risk of system failures, which are often caused by neglected maintenance.
7. Handling Gas Leaks or Electrical Sparks
Gas leaks and electrical sparks are serious emergencies that demand immediate action. A single spark near gas fumes can ignite an explosion, while exposed electrical wiring can lead to fires or even electrocution.
Immediate Action Steps
If you notice the telltale "rotten egg" smell of natural gas, leave the building right away. Avoid using anything electrical, including light switches or phones, as these can ignite gas fumes. Once you’re safely outside, call 911 and your local gas utility’s emergency hotline without delay.
In the case of electrical sparks, head straight to the main circuit breaker or fuse box and shut off the power. If standing water is near the panel, use a dry wooden stick to flip the breaker - never step into water while handling electrical systems. Sparks, buzzing noises, or a burning plastic smell around outlets or switches signal a critical issue that requires immediate attention from a professional.
“If you smell gas, it's an emergency. There is no room for delay or DIY fixes.”
— My Georgia Plumber
If the situation remains unresolved or you're unsure about the hazard, call for professional help right away.
When to Call Professionals
Both gas leaks and severe electrical issues need expert intervention. For gas leaks, professionals will inspect for damage, test for carbon monoxide, and confirm the system is safe before anyone re-enters the property. Electrical problems, such as exposed wiring or recurring breaker trips, should be handled by a licensed electrician. Emergency repairs for these situations typically range from $500 to $2,000.
Property Damage Prevention
Preparation can make a huge difference. Keep an emergency kit with essentials like a flashlight (to avoid using light switches), an adjustable wrench for gas valves, insulated tools, and a Class C fire extinguisher. Schedule yearly inspections for your electrical panels and gas systems, and pressure test older gas lines to catch potential issues early. Teach everyone in the household to recognize the "rotten egg" smell of natural gas and establish clear emergency contact procedures. Also, make sure areas around electrical panels and gas shutoff valves are always accessible - quick action can save lives and property when every second counts.
8. Clearing Major Drain Clogs in Common Areas
A serious drain clog in a multifamily or commercial property can quickly go from being a minor hassle to a full-blown crisis. If you’re noticing slow drains, gurgling noises, or even sewage odors across multiple units, it’s likely a main line blockage that needs to be addressed immediately.
Immediate Action Steps
Start by notifying all affected residents to stop using water entirely - this includes faucets, toilets, and appliances. Continuing water usage could worsen the problem.
If flooding has already begun, shut off the main water supply right away. If water reaches electrical outlets or panels, turn off power at the main breaker to avoid risks of electrocution or fire. Locate the main drain cleanout, which is usually in the basement, crawl space, or outside the building, so professionals can access it easily when they arrive. Be sure to document the situation with photos or videos, as this can be helpful for insurance claims. These measures can limit damage until experts take over.
When to Call Professionals
Widespread blockages are not something you can fix with DIY methods. While baking soda, vinegar, or hand augers might work for minor clogs, they’re rarely effective in larger systems. Issues like tree root intrusion or collapsed pipes often require professional tools and expertise. If you notice slow drainage in multiple units, loud gurgling sounds, or sewage backing up into tubs or basement drains, it’s time to call a licensed plumber.
“A serious backup can leave multiple units uninhabitable, and in most Bay Area neighborhoods, that means footing the bill for tenants to stay in a hotel.”
— Scott Hardesty, Caccia Plumbing
Professionals use tools like sewer cameras, motorized augers, and hydrojetting equipment to pinpoint and clear blockages effectively. While after-hours repairs can be expensive, the cost of waiting - tenant displacement, water damage, or worsening conditions - is often much higher.
Property Damage Prevention
Avoid using chemical drain cleaners in multifamily plumbing systems. These products can corrode pipes and pose risks to plumbers working on the lines. Instead, educate tenants on what not to flush - items like baby wipes, paper towels, and FOGs (fats, oils, and grease) are frequent culprits behind clogs.
For added protection, consider installing a backwater valve to prevent sewage or greywater from backing up into the building during a blockage. If your property has large trees, such as willows or silver maples, schedule annual sewer line inspections to catch root intrusions early. Keeping an on-site repair kit with essentials like a heavy-duty plunger, toilet auger, pipe wrench, and flashlight can help manage minor clogs. And keep in mind, mold can start growing on materials like drywall or wood within 24 to 48 hours of water exposure, so quick action is crucial.
9. Securing Broken Windows or Doors After Break-Ins
After a break-in, acting quickly and effectively is essential. Damaged windows or doors leave your property exposed to weather, vandalism, and further intrusions. The first step is ensuring everyone's safety - make sure all occupants are secure and evacuate if there's any immediate danger. Report the incident to law enforcement right away, then focus on securing the property.
Immediate Action Steps
Before starting repairs, document the damage thoroughly. Take photos and videos from multiple angles to capture evidence of forced entry - this will be crucial for filing insurance claims. Once documented, clear out any broken glass and debris from both inside and outside the property to remove hazards. If you’re dealing with a rental property, inform tenants immediately about the situation and outline the steps being taken to restore security.
To temporarily secure the opening, use plywood and a bracing system. Avoid relying on nails or screws alone, as they can be easily removed from the outside. Instead, use carriage bolts with nuts and washers, paired with an interior 2x4 brace, to create a sturdier barrier. This setup not only deters unauthorized entry but also shields the property from weather until permanent repairs can be arranged.
“A broken window is an invitation to trouble. It can't keep out the weather, and it's an easy target for vandals.”
— Diana Rodriguez-Zaba, Founder, ServiceMaster by Zaba
Once the property is temporarily secured, gather the tools and materials needed to board up the openings.
Tools and Materials Needed
For boarding up, use exterior-grade, un-sanded CDX plywood. Avoid OSB, as it doesn’t handle moisture well. The plywood thickness depends on the type of opening: 1/2-inch plywood works for standard windows, while sliding or French doors may require 3/4-inch boards. Essential tools include a power drill, circular saw, tape measure, and safety gear like leather gloves and safety glasses.
For added protection, place heavy plastic, such as trash bags, between the plywood and the opening to shield against weather. Seal any gaps with caulk, weather stripping, or duct tape to block water and drafts. If cracked glass panes remain in place, secure them with wide masking tape on both sides before boarding up to prevent shards from falling.
When to Call Professionals
While boarding up is a temporary solution, certain situations call for professional help. If there’s structural damage to load-bearing walls, if specialized locks or frames need replacement, or if repairs must comply with local building codes for wind loads and impact resistance, it’s time to bring in a licensed expert. Also, if an exterior door or lock can’t be secured, professional assistance is necessary.
In emergencies, it may take 8 to 12 hours to get a technician on-site. Costs for emergency repairs usually range from $300 to $1,000, depending on the extent of the damage. Be sure to contact your insurance company as soon as possible to report the incident and start the claims process. After temporary fixes are in place, schedule professional repairs to fully restore your property’s security.
10. Containing Floods from Water Heater Failures
When a water heater fails, it can unleash a surprising amount of water, quickly leading to property damage if not addressed immediately. In fact, statistics show that one in 60 insured homes files a water damage claim every year.
Immediate Action Steps
The first step is to shut off the water supply. Locate the cold water inlet valve on top of the heater and turn it clockwise. If you can’t access this valve, turn off the main water supply instead. Then, cut the power to the unit. For electric heaters, switch off the circuit breaker. For gas models, turn the gas control dial to "Off" or "Pilot." If water is pooling near electrical outlets or the breaker panel, avoid contact and shut off power at the main breaker only if it’s safe to do so.
To relieve pressure in the system, open hot water faucets throughout your home. If the tank is leaking from the bottom, connect a garden hose to the drain valve and direct the water to a safe location, such as a drain or outdoors.
Take steps to contain the water. Use towels, rugs, or sandbags to block doorways and prevent water from spreading to other areas. Move valuables and electronics out of harm’s way to minimize damage. Document the situation with photos and notes, as this can be helpful for insurance claims.
Once the leak is under control, gather tools and equipment to start water removal and drying.
Tools and Materials Needed
Safety first: wear rubber boots, waterproof gloves, and eye protection to handle potentially contaminated water. For water removal, use a wet/dry vacuum for minor spills or a submersible sump pump for larger amounts of water. Keep an adjustable wrench handy for stubborn valves.
Drying is critical to prevent mold, which can start growing within 24 to 48 hours. Use industrial fans, dehumidifiers, and a moisture meter to ensure no hidden water remains in walls or subfloors. Clean affected surfaces with heavy-duty detergent and disinfect with a 10% bleach solution.
“The length of time the water is allowed to remain is one of the biggest factors in overall damage and restoration costs.”
— Titan Restoration
When to Call Professionals
If the water heater tank is leaking, it’s likely a total failure, and you’ll need to call a licensed plumber for replacement. Professional help is also necessary if water has reached electrical wiring, multiple rooms are flooded, or you smell gas - evacuate immediately in this case and call from a safe location.
For severe damage, such as water trapped in walls or structural materials, restoration specialists are essential. Class 3 damage (high water volume with slow evaporation) or Class 4 damage (water absorbed into materials like concrete or hardwood) requires advanced equipment that goes beyond standard fans. If you notice structural issues, such as sagging ceilings, consult a structural engineer right away.
Property Damage Prevention
Time is of the essence. Dry porous materials like carpet, drywall, and insulation within 24 to 48 hours to avoid mold growth. Improve air circulation by opening windows and running fans and dehumidifiers continuously. Clean all surfaces with hot water and detergent, followed by a 10% bleach solution to disinfect.
To prevent future issues, consider installing water leak detection kits or smart shut-off valves that automatically stop leaks. Regular inspections of your water heater and surrounding pipes can catch small problems before they escalate. As Taylor Freeman, Lead Foreman at Brothers on The Side, emphasizes:
“If a pipe bursts and you don't turn off the water, you're looking at possibly tens of thousands of dollars of damage.”
— Taylor Freeman, Lead Foreman at Brothers on The Side
DIY Tools vs. Professional Services: A Comparison
When something goes wrong - like a plumbing leak, an HVAC failure, or roof damage - deciding whether to tackle the issue yourself or call in a professional is no small choice. Factors like cost, response time, and the complexity of the problem all play a role in this decision. Here's how to weigh your options.
DIY repairs shine when it comes to straightforward fixes. Think of tasks like replacing a faucet washer, plunging a clogged toilet, or resetting a tripped breaker. These types of repairs usually come with low material costs, often between $100 and $150, and you can act immediately - especially important when water is pooling or the power is out. Acting quickly can save you money, potentially cutting costs by 15–20% if the issue is resolved promptly.
However, not every problem is a DIY project. When safety risks, specialized tools, or building codes are involved, professional services are often the better choice. Hiring professionals can be costly, with rates varying widely - especially for emergencies or holiday calls. Their response time typically ranges from 2 to 24 hours, depending on service agreements.
“If a repair is time-sensitive and you have a busy schedule, hiring a professional can ensure the job is completed promptly and efficiently.”
— Brian McDowell, Zoom Home Inspections
The severity of the damage is another critical factor. Small issues, like a dripping faucet, are manageable for most homeowners. But larger emergencies - such as burst pipes, sewage backups, gas leaks, or HVAC failures during extreme weather - demand immediate professional attention. Major repairs, like replacing an HVAC system or a roof, are best left to experts. What could take you weeks to fix might only take professionals a few days, thanks to their tools, warranties, and adherence to building codes.
For example, companies like J National provide 24/7 emergency services for multifamily and commercial properties. Their certified technicians and specialized tools make them an ideal choice for handling complex repairs quickly and efficiently.
“A poorly executed DIY home maintenance project may end up costing more in the long run, as you may need to hire a professional to fix or redo the work.”
— Jennifer Yoingco, REALTOR
Conclusion
Emergency repairs play a critical role in protecting your property's value and ensuring compliance with legal standards. Preparation hinges on three essential steps: keeping an emergency toolkit stocked with must-have items (like adjustable wrenches, plungers, and flashlights), maintaining a vetted list of 24/7 vendors for key trades, and committing to preventive maintenance tasks such as annual roof inspections and seasonal HVAC checkups. These preventive measures help turn unexpected emergencies into manageable situations.
“Emergency maintenance is any property issue that poses immediate danger to resident safety or threatens structural integrity.”
— Jake Belding, Content Marketing Specialist, Buildium
When emergencies arise, having the right tools and contacts at your fingertips allows for quicker action. Still, certain situations - like gas leaks, electrical sparks, sewage overflows, or HVAC breakdowns during extreme weather - require immediate attention from professionals to ensure safety and avoid further damage. J National's 24/7 emergency services and skilled technicians are equipped to handle these high-stakes scenarios for multifamily and commercial properties.
“The first responsibility in any emergency maintenance situation is to protect life and safety.”
— FirstService Residential
Preparation saves lives, protects property, and safeguards your financial interests. A well-maintained toolkit, an updated vendor list, and a consistent maintenance schedule are your first line of defense. And when emergencies go beyond what you can handle, having a trusted repair partner ready to step in can make all the difference. This proactive approach ensures that emergency repairs not only address immediate issues but also strengthen your overall property management strategy.
FAQs
Which emergencies should I treat as “evacuate now” situations?
Emergencies like gas leaks, fires, flooding, severe weather damage, or any situation that puts lives or property at risk should be treated as “evacuate now” scenarios. For instance, a burst pipe leading to flooding or a gas leak requires immediate action. Focus on safety first - get everyone out and reduce potential dangers as quickly as possible.
What shutoff valves and breakers should I label in a multifamily building?
It's essential to clearly label the main water shutoff valve, as well as the individual fixture shutoff valves for toilets, sinks, and appliances. This small step can make a huge difference during emergencies, allowing you to act quickly and reduce potential damage.
The same goes for electrical breakers that control critical systems like HVAC units, water heaters, and the main electrical panel. Proper labeling ensures you can identify and access these systems without delay when every second counts.
What photos and notes should I collect for an emergency insurance claim?
When filing an emergency insurance claim, it's crucial to document everything thoroughly. Start by taking clear, well-lit, and timestamped photos of the damaged areas, such as broken pipes, roof issues, or flooding, before making any repairs. Alongside the photos, write detailed notes about the damage, including the date, location, and the severity of the issue.
If you need to make temporary repairs to prevent further damage, save all receipts for those efforts. These records - photos, notes, and receipts - will make the claims process smoother and help ensure your insurance company has all the necessary information.