
Winter can wreak havoc on properties if you're not prepared. From freezing pipes to skyrocketing heating bills, small issues can quickly spiral into costly emergencies. Here's how to stay ahead:
- Inspect HVAC systems: Schedule fall inspections, replace filters, and seal ducts to ensure efficient heating.
- Protect plumbing: Insulate exposed pipes, drain external faucets, and maintain a minimum of 55°F in vacant units to prevent freezing.
- Check roofs and gutters: Fix damaged shingles, clean out debris, and inspect for leaks to avoid ice dams and water damage.
- Seal windows and doors: Use weather-stripping and caulk to block drafts and keep heating costs down.
- Manage snow and ice: Secure snow removal contracts, stock de-icing supplies, and keep walkways clear to reduce hazards.
- Prepare for emergencies: Test fire extinguishers, stock emergency kits, and review insurance policies to handle winter surprises.
Start early to prevent damage, reduce energy costs, and keep tenants comfortable. A little preparation goes a long way in avoiding winter headaches.
HVAC System Inspection and Maintenance
Your heating system plays a critical role in keeping tenants comfortable during the winter months. If it breaks down, you’re not just dealing with unhappy residents - you could also be looking at emergency repair costs between $100 and $700. The best way to avoid this? Schedule professional inspections twice a year: once in the fall to prepare for heating season and again in the spring for cooling needs.
Schedule Professional Inspections
Make sure to book your fall HVAC inspection before the first freeze. Turning on heating units early can help identify problems while technicians are still readily available. Waiting until temperatures drop could leave tenants in the cold and lead to longer delays for repairs. To streamline this process, consider service contracts with licensed vendors. These agreements often include biannual check-ups and priority service during emergencies.
During inspections, ensure the technician performs essential checks like a combustion-efficiency test, heat exchanger leak check, and electrical component inspection. Before their visit, take some proactive steps: clear debris around outdoor units (keeping vegetation at least 2 feet away), replace air filters, and test smoke and carbon monoxide detectors. Regular upkeep, such as filter replacements and duct maintenance, will also help your system run efficiently and extend its lifespan.
Replace Air Filters and Clean Ducts
Dirty filters can overwork your HVAC system, driving up energy costs and wearing down equipment faster. Check filters monthly, and if they look dark or clogged, replace them right away - don’t wait for the standard three-month mark. To maintain proper airflow, keep at least 80% of your registers open.
Another key step is sealing ductwork. Leaky ducts can let heated air escape into walls or attics, wasting energy. Avoid using regular duct tape for this - it doesn’t hold up over time. Instead, have a professional apply a more durable seal. Keeping up with filter and duct maintenance not only cuts costs but also improves indoor air quality by reducing dust and other contaminants in circulation.
Test Thermostats and Calibrate Systems
A malfunctioning thermostat can cause uneven temperatures and waste energy. Start the winter season by replacing thermostat batteries, and have a technician calibrate the sensors for accurate readings.
For efficiency, set thermostats to 68°F when tenants are home and lower the temperature during sleep or when the property is empty. In vacant units, maintain a minimum of 55°F to prevent frozen pipes. This simple thermostat management can lower energy bills by 5% to 20% annually.
sbb-itb-c0ea5e9
Roof, Gutter, and Exterior Maintenance
Winter has a way of turning small exterior issues into expensive headaches. That’s why taking care of your roof, gutters, and exterior before the snow starts falling is so important.
Inspect Your Roof and Fix Any Damage
Winter conditions can make existing roof problems much worse, so it’s smart to check things out ahead of time. Look for loose, missing, cracked, or warped shingles - these are especially vulnerable to storms. If you have a flat or low-slope roof, check for areas where water tends to pool and fill those spots to prevent ice damage. Don’t forget to inspect the flashing around chimneys, vent pipes, and skylights to make sure moisture can’t sneak in.
For larger or more complex buildings, hiring a contractor for a professional inspection can save you from bigger expenses down the road. If you spot any rotting wood along the roofline, use epoxy wood filler to fix it before sealing the area. Also, check your attic’s ventilation and insulation. Poor insulation can let heat escape, which melts snow on the roof. When that melted snow refreezes at the eaves, it can create damaging ice dams.
Clean Out Gutters and Downspouts
Leaves, twigs, and other debris can clog your gutters, leading to drainage problems. When water can’t flow properly, it can back up under shingles or overflow near the foundation - both of which can cause serious damage when the water freezes. Clear out the debris, then flush the downspouts with a hose to make sure water flows freely and is directed several feet away from the building to avoid basement flooding.
Inspect the gutters themselves for rust, cracks, or loose parts. Snow and ice are heavy, and weakened gutters can easily give way under the weight. If you want to cut down on future maintenance, consider adding gutter guards to reduce debris buildup. A good routine includes a thorough cleaning twice a year - in spring and fall - and quick visual checks during winter to catch any issues early. Sealing exterior gaps can also add an extra layer of protection against winter’s challenges.
Seal Cracks and Check Insulation
Take a walk around your property and look for cracks in masonry, mortar, or the foundation. Water can seep into these gaps, freeze, and expand, making the damage worse. For small cracks (up to ¼ inch), caulk works well. For larger gaps (up to 3 inches), expanding foam spray is a better option. Also, seal any holes where pipes or cables enter the building to keep cold air out and prevent rodents from sneaking in.
Pay close attention to attic insulation, especially in older buildings. Insulation that’s wet or compressed doesn’t do its job and should be replaced. Encourage tenants to let you know if they notice condensation on windows or moisture on walls - these can be early signs of poor insulation or leaks. Addressing these issues not only protects your building but also keeps energy costs in check and ensures tenants stay comfortable during the colder months.
Plumbing Protection and Freeze Prevention
Frozen pipes are a costly headache for property managers during winter. Just imagine - a burst 2-inch pipe can spill 850 gallons of water every minute, and a 4-inch pipe? A staggering 3,400 gallons per minute. The average water damage claim for commercial properties hovers around $24,000. Taking steps to protect your plumbing system isn’t just smart - it’s essential.
Insulate Exposed Pipes
Start by identifying areas where pipes are most at risk, like basements, attics, crawlspaces, and exterior walls. These unheated spaces need insulation right away. Foam sleeves are a budget-friendly, straightforward solution for most exposed pipes, while heat tape offers extra protection for pipes in colder spots that might need active heating. Don’t forget to seal pipe entry points with caulk or spray foam to keep cold air out.
For vacant units, set thermostats to at least 55°F. If you want an added layer of safety, aim for 60°F–62°F. During extreme cold, encourage tenants to leave kitchen and bathroom cabinet doors open to let warm air circulate around the pipes. A small trickle of both hot and cold water can also help prevent freezing.
These steps complement earlier HVAC precautions by focusing directly on protecting your plumbing.
Drain External Faucets and Shut Off Water
Make sure to insulate the main shut-off valve and the backflow assembly on irrigation systems. Hire licensed contractors to use compressed air for safely clearing out irrigation lines. Also, tag all shut-off valves so your maintenance team can quickly locate them during emergencies.
Inspect Water Heaters
Water heaters need attention too. Check them for leaks, corrosion, or signs of wear. Keep the temperature setting consistent to ensure efficient performance and a reliable hot water supply. Clearly label the shut-off valve on the cold water inlet for easy access in case of emergencies. If a unit will be vacant for a long time, turn off the water heater, flush and drain it, blow air through the lines, and add non-toxic antifreeze to prevent freezing.
Snow, Ice, and Grounds Management
Winter storms in 2021 led to a staggering $15 billion in insured losses. Taking steps to manage snow and ice effectively not only safeguards your property but also ensures everyone's safety. A well-thought-out approach to grounds management can help avoid costly accidents and keep operations running smoothly during the winter months.
Plan Snow Removal and Stock Up on Supplies
Lock in snow removal contracts before winter hits to ensure you're a priority for service. Collaborate with your contractor to create a snow-distribution plan that clearly identifies where plowed snow should be stored, particularly near flat roofs or busy parking areas.
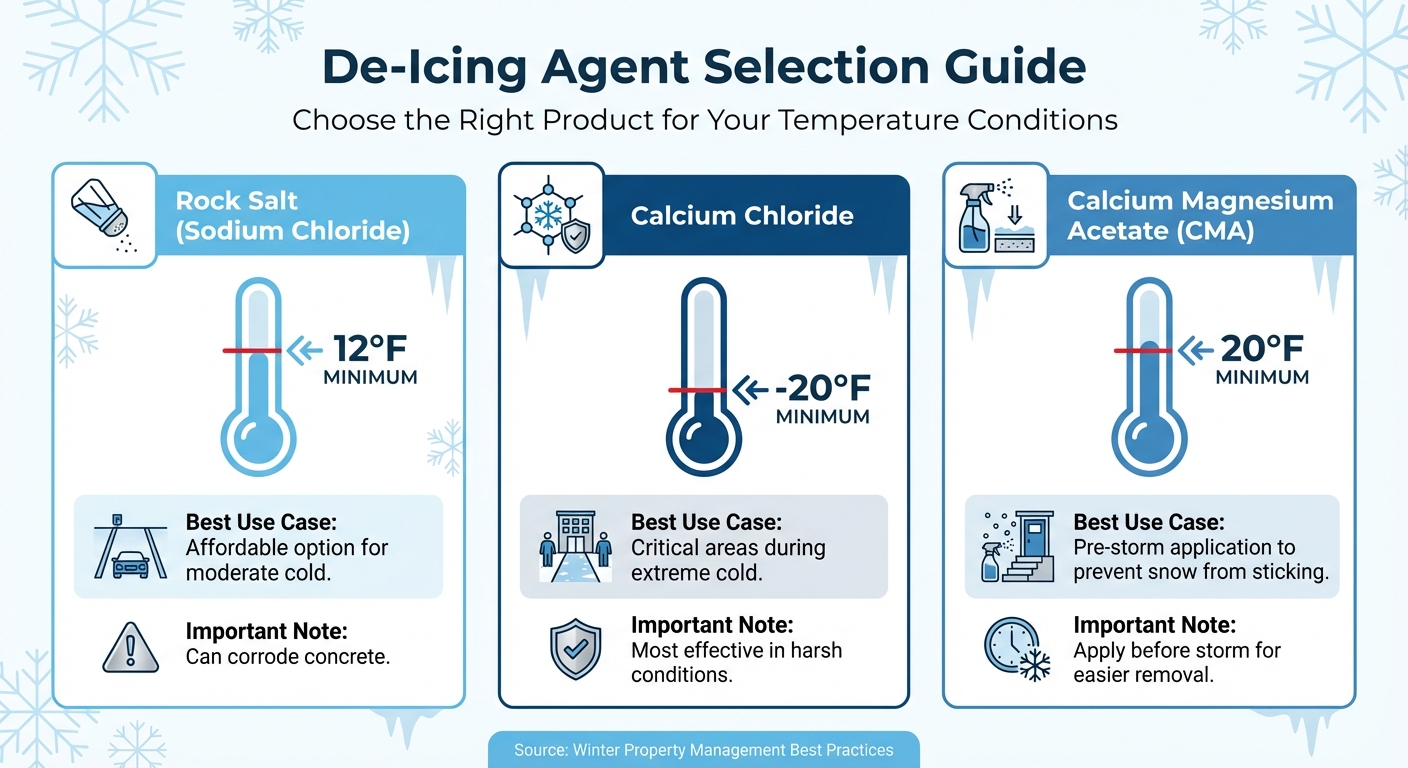
Take stock of essential supplies like salt, sand, gas, and oil, and inspect snow removal equipment for any wear and tear. Different de-icing materials work under specific conditions: Rock salt is effective above 12°F, calcium chloride works in temperatures as low as -20°F, and Calcium Magnesium Acetate (CMA) is best applied before a storm to prevent snow from sticking.
Here’s a quick guide to common de-icing agents:
Winterize Landscaping and Outdoor Equipment
Prune tree branches that hang over driveways, sidewalks, or power lines before winter arrives. Snow and ice buildup can cause branches to break, posing serious safety risks. Keep tools like snow rakes and draglines on hand for clearing heavy snow from rooftops and overhangs. Before tackling any roof snow removal, mark potential hazards such as skylights, roof drains, or vents to minimize accidents.
Once the outdoors is prepped, turn your attention to indoor safety measures.
Add Mats and Monitor Walkways
Place absorbent mats at all building entrances to catch moisture and salt. These mats not only reduce slip hazards but also protect flooring from salt damage. Mop high-traffic areas regularly to clean up snow-melt puddles and salt residue that could make floors slippery.
Daily inspections during freezing weather are essential to identify and address new ice patches. Ensure that downspouts direct water away from walkways to prevent melted snow from refreezing into hazardous ice. Repair cracks in walkways and stairs before winter to avoid hidden tripping hazards under light snow or ice. Installing timed or motion-activated lights can improve visibility during dusk and nighttime, helping people spot icy spots more easily. Lastly, always use "Wet Floor" signs in lobbies and shared spaces when snow-melt or storms create slick conditions indoors.
Windows, Doors, and Building Sealing
Drafty windows and doors can make your home uncomfortable and drive up heating bills. Look for poorly fitting windows and doors, visible cracks in the building’s structure, or worn-out seals that might let the cold in. Condensation on windows is another clue - it often points to poor insulation. Here’s how to get your building ready for winter.
Seal Drafts with Weather-Stripping
Weather-stripping is an easy way to stop cold air from sneaking in. Use caulk to fill gaps up to 1/4 inch and foam spray for larger gaps up to 3 inches. For exterior doors, add door sweeps to keep out drafts, snow, and ice. Don’t forget to replace worn weather-stripping, especially on doors that see a lot of use.
Inspect and Replace Damaged Glass
Cracked or broken windows are a major source of heat loss. If you’re replacing windows, consider upgrading to triple-paned glass or vinyl frames. These options are more durable and require less upkeep compared to wood or metal, especially in harsh winter weather. Installing storm windows or glass panels in late fall can also add an extra layer of insulation, helping to cut energy costs.
Check Attics and Pest Entry Points
Heat often escapes through the roof, so make sure your attic is properly insulated with at least six inches of material. While sealing drafts, be careful not to block necessary ventilation paths - trapped moisture can cause bigger problems down the line. Also, inspect the foundation, masonry, and areas where pipes or cables enter the building. Seal any gaps large enough for rodents to squeeze through to keep both the heat in and pests out. These steps will help ensure your building is winter-ready.
Emergency Preparedness and Equipment Checks
Beyond regular upkeep, it's essential to prepare for unexpected emergencies to protect your property. Winter storms, for instance, can lead to power outages, frozen pipes, or hazardous conditions. Having the right supplies and ensuring your equipment is in good working order allows you to act swiftly instead of scrambling in a crisis.
Review Insurance Policies
Did you know that about 1 in 67 insured homes experiences property damage due to water or freezing issues? Check with your insurance agent to confirm that your policy covers water damage and remediation after a burst pipe. Keep digital records of any maintenance work - these can be critical when filing claims.
Stock Emergency Kits
Make sure you have an emergency kit tailored to both general survival needs and winter-specific challenges. Your kit should include:
- Several days' supply of water
- Non-perishable food
- First-aid supplies and essential medications
- Blankets and thermal clothing
- Shovels, ice melt, or sand
- Extra fuel for snow removal equipment
- Backup generators, flashlights, and batteries
Ensure everyone on your team knows where these supplies are stored. To reduce slip risks from snow and ice, place heavy-duty floor mats at entrances.
Test Fire Extinguishers and Winterize Machinery
Winter months bring heightened fire risks, with damages reaching around $1.1 billion annually. Regularly test fire extinguishers, smoke alarms, and carbon monoxide detectors. Confirm that fire pump room heaters and fire suppression systems comply with NFPA 20 standards.
For snow blowers and other machinery, inspect for worn parts, replace fluids, and either drain fuel or add stabilizers. Check your backup generator's fuel levels and battery functionality. Additionally, ensure heat tracers for pipes and electronic access systems are part of your emergency power load.
“It's not a seasonal task - it's a year-round mindset... December through March may bring unpredictable freezes, but through thoughtful budgeting, meaningful partnerships, and lessons learned, I'll be ready, no matter what.”
— Brock Gallman, Chief Engineer, CP Group at Bank of America Plaza
Conclusion
Taking care of winter maintenance not only safeguards your property but also ensures tenants stay cozy during the colder months. By sticking to this checklist, you can steer clear of expensive last-minute repairs and set up a property that’s ready to handle winter’s challenges.
Prepping for winter ahead of time helps cut down on energy costs and prevents damage that could lead to hefty repair bills. Plus, staying on top of maintenance keeps tenants happy - a key factor in retaining long-term renters.
Start your preparations well before the first freeze to allow ample time for inspections and repairs. Use digital tools to streamline your maintenance schedule and keep track of work orders so that no essential tasks slip through the cracks. For more complex tasks like HVAC servicing, chimney cleaning, or handling heavy snow removal, it’s wise to rely on licensed professionals who can act swiftly during extreme weather conditions.
This forward-thinking approach pays off in measurable ways.
“By being proactive, you'll lower energy bills, increase the efficiency and lifespan of home components, and make your property safer.”
— Bob Vila
At J National, we’re here to help you tackle winter maintenance with ease. From HVAC inspections and plumbing protection to roof repairs and 24/7 emergency support, we provide services tailored to your property’s specific needs. Reach out to us for a free on-site evaluation and ensure your property is fully prepared for the winter months ahead.
FAQs
What steps can I take to keep pipes from freezing during winter?
To keep pipes from freezing during winter, begin by insulating exposed pipes, particularly in unheated spaces like basements, attics, or garages. It's also important to maintain an indoor temperature of at least 55°F, even if the property is vacant, to help prevent water in the pipes from freezing.
In especially cold weather, allow faucets connected to at-risk pipes to drip slightly - this helps relieve pressure that could lead to bursting. Seal drafts around windows and doors to block out cold air, and open cabinet doors under sinks so warm air can circulate around the pipes. For outdoor faucets and sprinkler systems, turn off the water supply and drain any leftover water to avoid freezing and potential damage.
These simple precautions can go a long way in preventing frozen pipes and the expensive repairs that often come with them during the colder months.
How can I prepare my HVAC system for the winter season?
Getting your HVAC system ready for the colder months starts with preventative maintenance. Begin by scheduling a professional inspection to examine critical components like furnaces, boilers, and heat pumps. Identifying and addressing potential problems now can save you from unexpected breakdowns when temperatures drop.
Don’t forget to replace or clean the air filters - this simple step ensures proper airflow and helps your system run more efficiently. While you’re at it, inspect the ductwork for any leaks or gaps that might allow heat to escape. It’s also a good idea to calibrate your thermostats for winter settings and test all heating controls to confirm they’re functioning properly.
By taking these steps, you’ll boost energy efficiency and keep your property warm, safe, and comfortable for everyone throughout the season.
What’s the best way to manage snow and ice on my property to prevent accidents?
To keep your property safe during the winter months, having a solid snow and ice management plan in place is key. Start by gathering essential supplies like salt, sand, and de-icing products. Make sure your snow removal tools - shovels, snow blowers, and plows - are in good shape before the first snowfall. If you rely on a snow removal service, lock in a dependable provider ahead of time to avoid last-minute scrambling during storms.
Keep walkways, parking lots, and entryways clear on a regular basis to prevent ice from building up and ensure safe access for everyone. Use salt or sand to reduce slippery spots, especially on stairs and sloped areas. Trimming overhanging branches near pathways can also eliminate risks from falling ice or debris during severe weather. Don’t overlook outdoor lighting - well-lit areas improve visibility and help prevent accidents.
By preparing early, staying consistent with maintenance, and addressing snow removal promptly, you can keep your property safe and accident-free all winter.
Related Blog Posts